Configuration for Synology (NAS)
Important
To use DynDNS a DNS API user MUST exist. To do that follow the guide Create User in Customer Portal!
For all domain customers we offer a DynDNS service which communicates with the Servercow nameservers via the Servercow DNS API.
In the following article you will learn how to connect your Synology NAS1 to the DynDNS interface of Servercow in order to use the DynDNS service and get direct access to your NAS via FQDN2.
Via External Access (UI) - IPv4 Only!
Danger
Although this option is the most convenient method for Synology NAS, it is only designed for IPv4. IPv6 is only possible in the manual variant via CLI! See also: Via Bash Script (CLI) - Dual Stack (IPv4 & IPv6) capable
-
Open your NAS in a Browser and login with a Admin User
Notice
If you do not know the IP of your NAS, it is best to use the Synology Assistant to find your NAS on your network.
-
Open the settings for external access on your NAS:
Control Panel > Connectivity > External Access > DDNS -
Click on
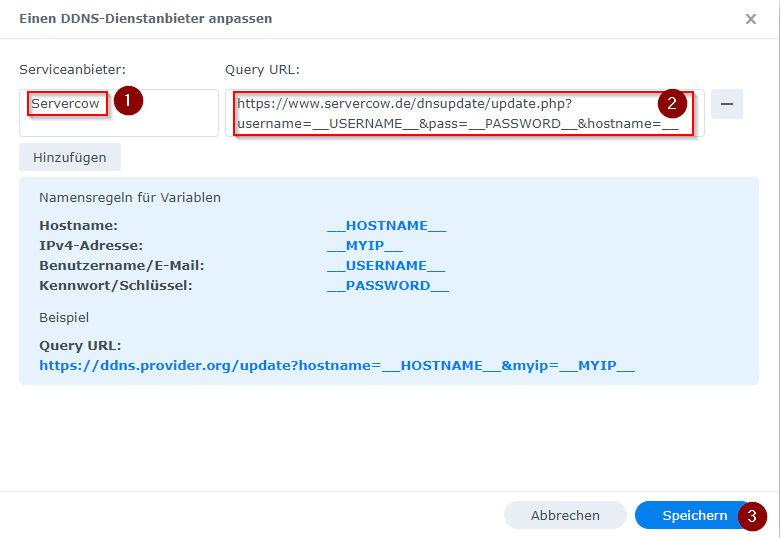
Customise Providerthere. -
Enter the following information in the
Service Provider&Query URLfields:- Service Provider: Servercow
- Query URL:
https://www.servercow.de/dnsupdate/update.php?username=__USERNAME__&pass=__PASSWORD__&hostname=__HOSTNAME__&ipaddr=__MYIP__
Danger
Please do not fill in the data between the underscores (__)! The NAS automatically recognises the placeholders and fills them in.
-
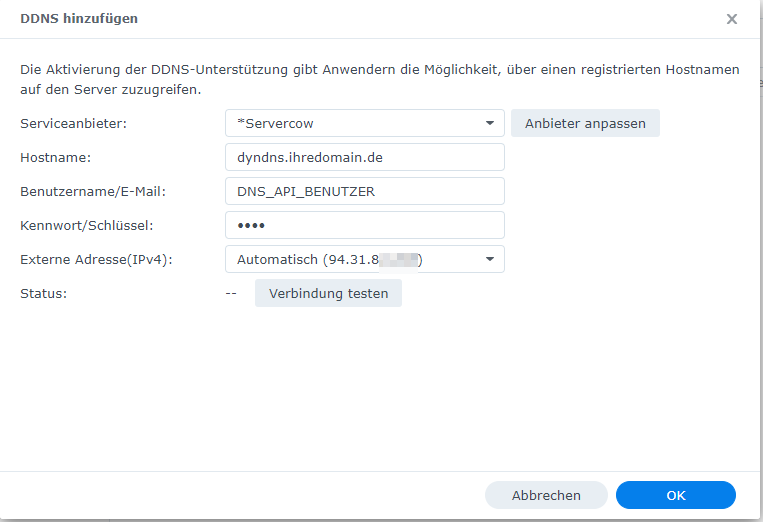
Add a new DynDNS login by clicking on
DDNS > Add. Please enter the information there as follows:- Service Provider: Servercow
- Hostname: Your subdomain/domain which should be updated via DynDNS (e.g.
dyndns.yourdomain.com) - Username/Email: Your DNS API User
- Password/Key: Your DNS API User Password
- External Address (IPv4): The public IPv4 address of your connection. (Mostly automatically detected)
Success
If you have set everything correctly, the status at
Test Connectionshould change to normal and light up green.
Via Bash Skript (CLI) - Dual stack (IPv4 & IPv6) capable
Notice
These instruction assume that your NAS is accessible via SSH. If this is not the case, please activate SSH access to your NAS using these instructions!
-
Login to your NAS via SSH by using a Admin User.
Notice
If you do not know the IP of your NAS, it is best to use the Synology Assistant to find your NAS on your network.
-
Change to the root user by typing
sudo -iand authenticate with the password of the current user. -
Create a new bash script in one of your created volumes e.g.
/volume1/datawith the nameddns.shand the content:/volume1/data/ddns.sh#!/bin/bash if [ -f /tmp/old_ip4 ]; then IP4_OLD=$(</tmp/old_ip4) else IP4_OLD=none fi IP4_NEW=$(curl -s ip4.mailcow.email) if [[ "${IP4_NEW}" != "${IP4_OLD}" ]]; then curl -s -X POST 'https://api.servercow.de/dns/v1/domains/IHRE_DOMAIN.tld' \ -H 'X-Auth-Username: IHR_API_BENUTZER' \ -H 'X-Auth-Password: IHR API PASSWORD' \ -H 'Content-Type: application/json' \ --data "{\"type\":\"A\",\"name\":\"subdomain\",\"content\":\"${IP4_NEW}\",\"ttl\":60}" -o /dev/null fi echo ${IP4_NEW} > /tmp/old_ip4 if [ -f /tmp/old_ip6 ]; then IP6_OLD=$(</tmp/old_ip6) else IP6_OLD=none fi IP6_NEW=$(curl -s ip6.mailcow.email) if [[ "${IP6_NEW}" != "${IP6_OLD}" ]]; then curl -s -X POST 'https://api.servercow.de/dns/v1/domains/IHRE_DOMAIN.tld' \ -H 'X-Auth-Username: IHR_API_BENUTZER' \ -H 'X-Auth-Password: IHR API PASSWORD' \ -H 'Content-Type: application/json' \ --data "{\"type\":\"AAAA\",\"name\":\"subdomain\",\"content\":\"${IP4_NEW}\",\"ttl\":60}" -o /dev/null fi echo ${IP6_NEW} > /tmp/old_ip6/volume1/data/ddns.sh#!/bin/bash if [ -f /tmp/old_ip ]; then IP_OLD=$(</tmp/old_ip) else IP_OLD=none fi IP_NEW=$(curl -s ip4.mailcow.email) if [[ "${IP_NEW}" != "${IP_OLD}" ]]; then curl -s -X POST 'https://api.servercow.de/dns/v1/domains/IHRE_DOMAIN.tld' \ -H 'X-Auth-Username: IHR_API_BENUTZER' \ -H 'X-Auth-Password: IHR API PASSWORD' \ -H 'Content-Type: application/json' \ --data "{\"type\":\"A\",\"name\":\"subdomain\",\"content\":\"${IP_NEW}\",\"ttl\":60}" -o /dev/null fi echo ${IP_NEW} > /tmp/old_ip/volume1/data/ddns.sh#!/bin/bash if [ -f /tmp/old_ip ]; then IP_OLD=$(</tmp/old_ip) else IP_OLD=none fi IP_NEW=$(curl -s ip6.mailcow.email) if [[ "${IP_NEW}" != "${IP_OLD}" ]]; then curl -s -X POST 'https://api.servercow.de/dns/v1/domains/IHRE_DOMAIN.tld' \ -H 'X-Auth-Username: IHR_API_BENUTZER' \ -H 'X-Auth-Password: IHR API PASSWORD' \ -H 'Content-Type: application/json' \ --data "{\"type\":\"AAAA\",\"name\":\"subdomain\",\"content\":\"${IP_NEW}\",\"ttl\":60}" -o /dev/null fi echo ${IP_NEW} > /tmp/old_ipQ: Why don't we just create the file in the
/rootdirectory or somewhere else?A: When updating the DSM3, it can happen that all files that are not explicitly located on a created storage pool are deleted. For example, after a major update.
-
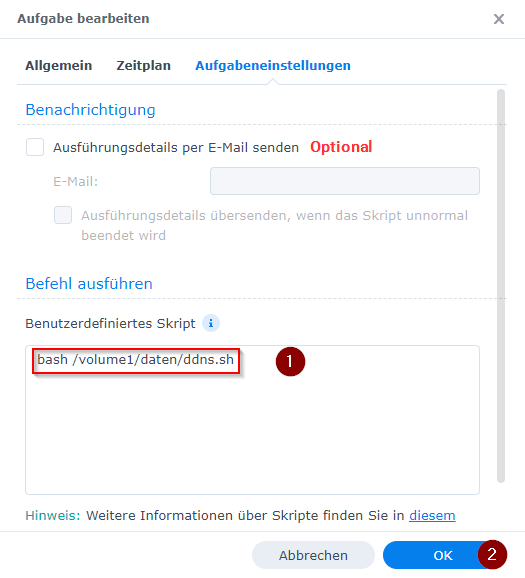
Make the
ddns.shfile executable:chmod +x /volume1/daten/ddns.sh -
Open your NAS in Browser and Login as Admin user.
-
Navigate to the
Task Schedulerin options:Control Panel > Task Scheduler -
Create a
Scheduled Task > User-defined scriptthere:
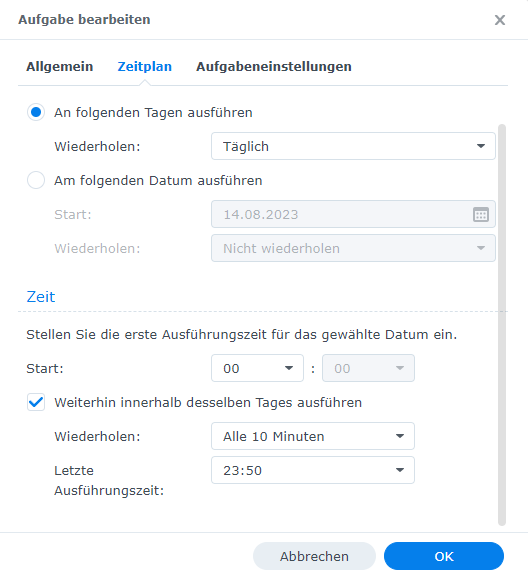
Success
If everything has been set correctly, the DDNS update job runs every 10 minutes, every day. If necessary, the time until the next run can be decreased/increased at any time.